


You’ve been there. You generate an image in Midjourney or DALL-E. It’s 90% perfect. But the guy on the left has six fingers. The background has weird text. The lighting on the face is wrong.
You try to fix it with a follow-up prompt. “Same image but fix the hand.” Now the dog has three ears. The background changed. The style shifted. You’re playing whack-a-mole with pixels.
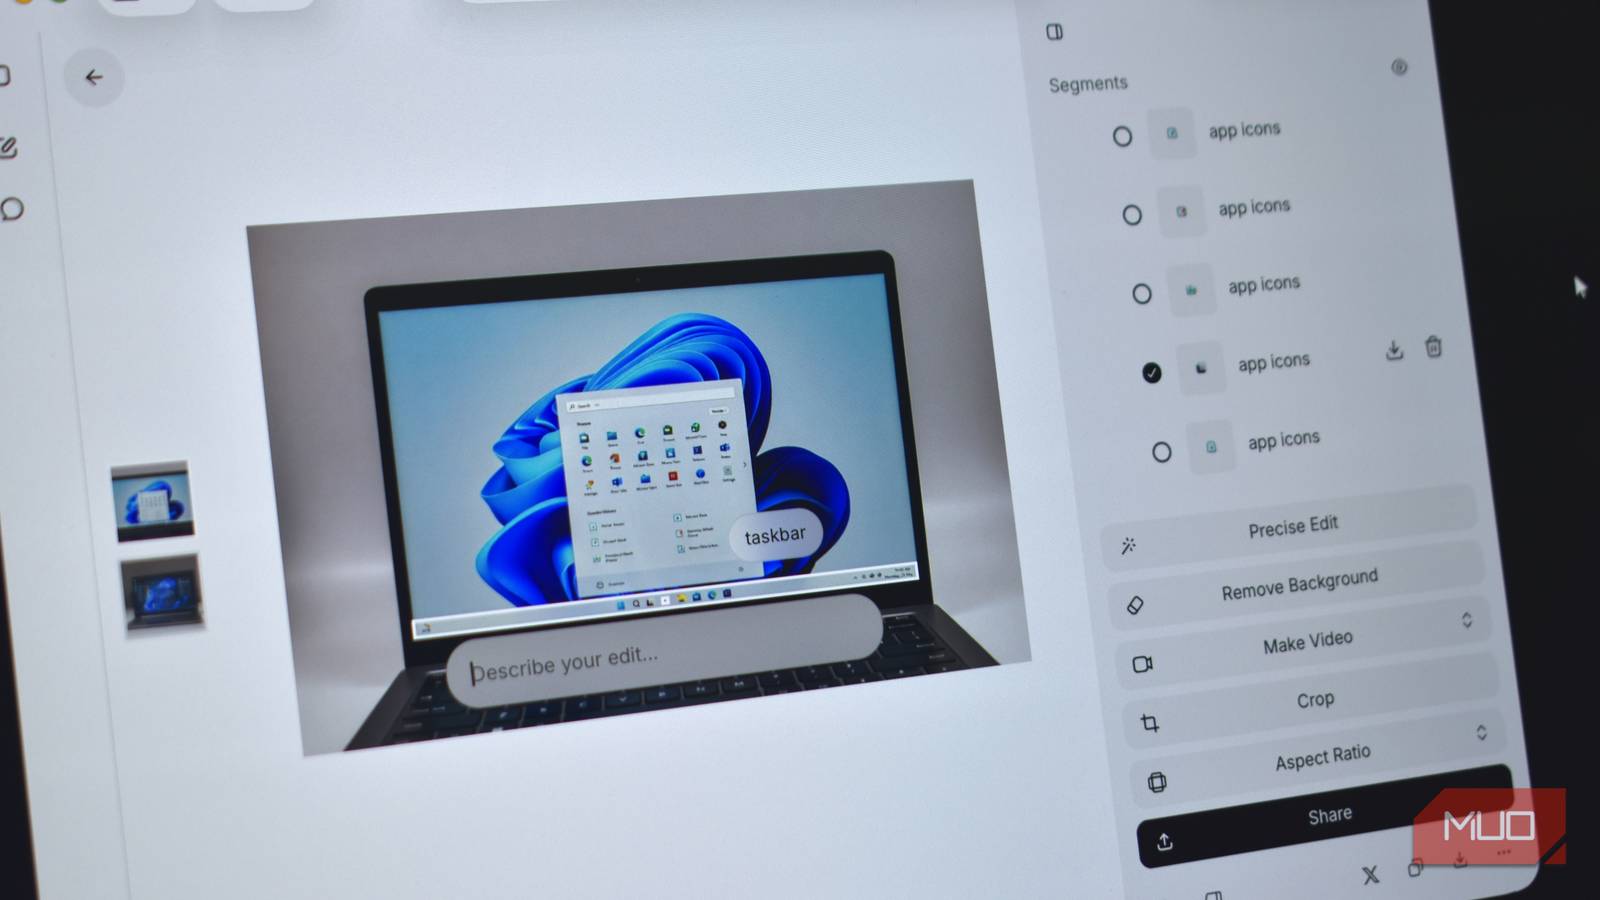
Grok image editing layers changes this. Grok’s new Imagine Image 2.0 automatically breaks your image into selectable segments — like Photoshop layers, but created by AI. You click the element you want to change. You type what you want. Only that element changes. The rest stays put.
It’s not perfect. The segments aren’t true layers — you can’t drag them around, blend them, or mask them like Photoshop. But for 80% of what people actually want to do (“change the shirt color,” “remove the background,” “make the car red”), Grok image editing layers works. And it runs in your browser, no 20/month Creative Cloud subscription needed.
Here’s how to use it.
The Problem: AI Image Editing Was a Guessing Game
Generative AI has been great at creating. Terrible at editing.
You get one shot at the prompt. If the result isn’t right, you re-roll. You burn credits. You waste time. You develop a superstition about which seed numbers are “lucky.”
The few tools that offered editing — inpainting in Stable Diffusion, generative fill in Photoshop — required technical setup or expensive subscriptions. They also required you to manually paint masks. You’re not a roto artist. You just want the shirt blue.
Grok’s segments solve the masking problem. The AI analyzes the image, identifies distinct objects, and outlines them automatically. You hover, you see a white outline. You click, you get a selection. You prompt, only that selection changes.
Grok Imagine Image 2.0 Changes Everything
Released August 2026, Imagine Image 2.0 is xAI’s latest image model. The headline feature: automatic segmentation. Every generated image gets a “Segments” panel on the right side showing every element the AI detected.
The feature set includes:
– Segments panel: Photoshop-like layer list, auto-generated
– Magic Wand: Click to select similar areas (like Photoshop’s magic wand)
– Background removal: One-click, automatic
– Reference images: Upload up to 5 images to guide style/composition
– Smart Resize: Change aspect ratio, AI fills the new space
Access requires X Premium (8/mo) or the standalone Grok app. No separate image credits — it’s included.
Getting Access to Grok Image Generation
Option 1: X Premium on web
1. Subscribe to X Premium at x.com/premium
2. Go to grok.x.com or use the Grok sidebar on X
3. Select “Imagine” mode
Option 2: Grok mobile app
1. Download from App Store or Google Play
2. Sign in with X Premium account
3. Tap the image icon
Option 3: Grok API (developers)
– REST API at api.x.ai
– Requires separate API key application
For this guide, I’ll assume the web interface at grok.x.com. The app works identically.
Understanding Segments: Not Quite Photoshop Layers
Here’s the honest truth: segments are not layers. In Photoshop, a layer is a discrete pixel buffer you can move, transform, blend, mask, and reorder. A segment is a selection mask tied to the base image.
What segments CAN do:
– Isolate an element for targeted editing
– Apply a prompt to only that element
– Remove background from that element
– Duplicate the element (generates a copy in place)
What segments CANNOT do:
– Drag to reposition (the element stays where it is)
– Resize independently
– Change blending mode (multiply, screen, overlay, etc.)
– Add layer masks for gradual transitions
– Reorder stacking order
Think of segments as “smart selections that persist” rather than “layers.” For most edits, that’s enough. For compositing, you still need Photoshop or Canva.
Canva Magic Layers, by comparison, gives you true layer control — you can drag, resize, reorder. But Canva doesn’t generate the base image. Grok generates AND segments. Different tools for different jobs.
Step 1: Generate Your Base Image
Start with a detailed prompt. The more specific you are, the better the segmentation works.
Weak prompt: “A laptop on a desk”
Strong prompt: “A MacBook Pro 16-inch on a walnut desk, showing a VS Code window with Python code, a coffee mug to the right, a mechanical keyboard in front, warm golden hour lighting from a window on the left, photorealistic, 8K”
The strong prompt gives the AI clear spatial relationships. The laptop, screen, code, mug, keyboard, desk, window — each becomes a clean segment.
Hit generate. Wait 10-15 seconds. You get four variations. Pick the best one. Click it to open the detail view.
Step 2: Open the Segments Panel
In the detail view, look at the right sidebar. You’ll see a “Segments” tab (icon looks like stacked squares). Click it.
You’ll see a list like:
– MacBook Pro laptop
– VS Code window
– Python code text
– Coffee mug
– Mechanical keyboard
– Walnut desk
– Window light
– Background wall
Each has a thumbnail. Hover any item — a white outline appears on that element in the main image. Click to select.
Step 3: Select and Edit Individual Elements
With an element selected (white outline visible), type your edit in the prompt box at the bottom.
Example: Select “Coffee mug” → Type “Change to a matte black ceramic mug with a subtle logo” → Hit enter
Only the mug changes. The laptop, keyboard, desk, lighting — all untouched.
Example: Select “VS Code window” → Type “Show a terminal running ‘npm run dev’ with green text on dark background” → Hit enter
The code changes. The laptop bezel, desk, mug — unchanged.
This is the workflow. Select. Prompt. Review. Repeat.
Step 4: Magic Wand for Precision Edits
Sometimes the automatic segments miss a detail. The logo on the mug. The keys on the keyboard. The reflection on the screen.
Click the Magic Wand icon (sparkle icon) in the toolbar. Click the area you want to isolate. Grok creates a temporary segment just for that area.
Example: Magic Wand click on the ESC key → Type “Make this key red with white legend” → Enter
Only that key changes. Perfect for “change the button color” or “fix this one face” edits.
The Magic Wand also works for removing unwanted elements. Select the stray cable on the desk → Type “Remove this cable, fill with wood texture” → Gone.
Step 5: Background Removal and Reference Images
Background removal: With any element selected, click the “Remove Background” icon (scissors icon). The element is isolated on transparent. Great for product shots, logos, composites.
Reference images: Click the “+” icon in the prompt bar. Upload up to 5 images. Grok uses them for style, composition, color palette, or specific details.
Example workflow: Generate a character → Upload a reference photo of a specific jacket → Select character’s torso segment → Type “Wearing the jacket from the reference image” → Character now wears that exact jacket.
This is powerful for consistency across multiple generations.
Step 6: Smart Resize for Any Aspect Ratio
Generated a perfect 16:9 landscape but need a 9:16 vertical for Reels? Click the resize icon (crop icon). Choose your target aspect ratio. Grok extends the canvas and fills the new space intelligently.
Example: Horizontal laptop desk shot → Resize to 9:16 vertical → Grok adds more desk, more wall, more window above and below. The laptop stays centered. The perspective holds.
It’s not perfect — sometimes it hallucinates weird furniture in the extended areas — but it’s 90% there. You can then use segments to fix the weird parts.
Grok vs. Canva vs. Photoshop: Honest Comparison
| Feature | Grok Segments | Canva Magic Layers | Photoshop |
|---|---|---|---|
| Auto-segmentation | Excellent | Manual | Manual (select subject) |
| Targeted editing | Prompt-based | Manual tools | Manual tools |
| Drag/reposition | No | Yes | Yes |
| Resize element | No | Yes | Yes |
| Blending modes | No | Yes | Yes |
| Layer masks | No | Yes | Yes |
| Generate base image | Yes | No (Firefly separate) | Firefly |
| Cost | 8/mo (X Premium) | 15/mo (Pro) | 23/mo |
| Learning curve | 5 minutes | 30 minutes | Months |
Bottom line: Grok is for “I generated this, now fix these three things.” Canva is for “I have assets, now compose them.” Photoshop is for “I need pixel-perfect control.”
Most beginners need Grok. Most pros need all three.
Pro Tips for Better Segment Control
Prompt for segmentation in your initial prompt. “Distinct objects: laptop, mug, keyboard, plant — each clearly separated” helps the segmenter.
Use “isolate” language. “Isolate the mug and change only its color” works better than “make the mug blue.”
Segment names matter. If the panel shows “Object 1, Object 2, Object 3,” the AI didn’t understand the scene. Regenerate with a more descriptive prompt.
Combine reference images with segments. This is the killer combo for character consistency. Generate character → reference upload → segment select outfit → apply reference.
Don’t fight the segment boundaries. If the AI grouped the mug and keyboard as one segment, you can’t easily separate them. Regenerate with “mug and keyboard clearly separated on desk.”
Save your segment workflows. The prompts that work for “change clothing color” or “swap background” become templates. Build a personal library.
Takeaway: Photoshop Power Without the Learning Curve
Grok’s segments won’t replace Photoshop for professionals. They’re not designed to. They replace the frustration of “I just want to change one thing” for everyone else.
You generate. You click. You type. It changes. That’s the loop.
For 8/month (which also gives you X Premium, Grok chat, and higher rate limits), it’s the most accessible targeted image editing on the market. Canva Magic Layers is better for composition. Photoshop is better for control. Grok image editing layers is better for editing what you just made.
Try it on your next AI image. Generate something. Open segments. Click the thing that bugs you. Fix it in one prompt.
You’ll wonder how you lived without it.